Interview with Drew Keller of StoryGuide (Time: 38 min.) who offers some tips on quickly shooting elements of an interview-based video to get all the aspects of the story you need.
 Drew Keller (@drewkeller) is the founder of StoryGuide, a site filled with great advice on how to tell a story with video. Keller speaks and teaches on this topic everywhere, and he gave us a little of his time to be on this week’s episode. Read and listen on for his great advice on sequencing a story for video.

Tips on using your camera to tell your story
Have a plan: Sounds basic, but you really need to know what you want before you begin. If you don’t, you’ll go on a fishing expedition and the production will be a mess and you won’t know what you’ve got.
You have four narratives available to work with: Keep in mind you have four elements that you can work with to tell your story. They are dialogue or script, visuals, music, and natural sound. Your job is to manage how these things coincide.
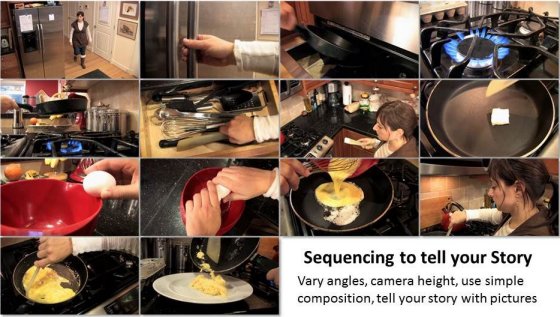
Create a shot list: As part of your plan, put together a series of shots you know you’ll need to tell your story. For example, you’ll want an establishing shot, or wide shot so the viewer can orient themselves who our character is and what our environment looks like. One good technique is to start wide and then come in close getting your medium shots, close ups, and extreme close ups. Survey your space and see what the actions are and then essentially follow that action with your camera from different angles. The point of all the shots is so your editor has more words for which to choose, many of them may be synonyms, to tell your story. The other reason to create the checklist is that you will for sure become distracted. This list will remind you what you have to do. Keller’s rule of thumb for a 30-second sequence is to shoot 20-25 clips, but in the end he’ll only use about 12 to 16 to make up that 30-second sequence.

Vary angle: We tend to shoot our videos from the height we see the world, at our eye level. You can actually say something more about the shot from the angle you shoot it. For example, if you shoot up, you can make something seem bigger or imposing. Shooting down minimizes something, and if you bring it low to the ground you can have the viewpoint of a child or even an animal.
Look for the details: What are the specific elements that are mentioned in the interview? Did you remember to get shots of them, and did you get them at varying angles?
Make sure you get enough shots: My editor’s number one complaint is that there’s not enough b-roll, or extra video to tell the story. Always shoot extra shots to give your editor some elements to work with. Not having enough shots is like not having enough words to tell your story.
Make your subject feel comfortable: Don’t use film industry terms such as action, stop, and wait. It’ll take your interviewee out of the moment. Instead, give the subject a heads up that you’re going to be shooting them doing their job and that in some cases you may stop them just so you can get the same action from a different angle. Let them know that they’re not doing anything wrong. It’s just this is how you have to tell your story and that requires a few gentle stops and restarts. Instead of those film industry terms, use more gentle terms such as, “Can we do that again?” or “OK, let’s go.” It’s affirmative direction and helps your subject pay less attention to the camera, and makes their actions appear far more natural.
Advantages of having the interviewee look into the lens versus off to the side: Interviewees that look into the lens are being direct and so it’s coming off more as a first person communication. This is often used as direct communications. For example, the CEO is talking to his employees. Or it can be “how to” content where the subject is showing you the viewer how to do something. When they’re looking off camera there’s an intermediary and it’s clear that this content is being produced. This is most often used in reporter- or documentary-style videos. With subjects looking off to the side, you want the viewer to be more an observer in a scene.
Multiple cameras for a single interview: If you want to avoid using a jump cut, or having to hide a cut with some b-roll, you can set up another camera to give you some edit options. It can also add some drama to a certain quote. To get that drama and emotion you’ll need a camera that’s an extreme close up. To reset where you are, a wide shot would be more appropriate.
Zoom rule of 1-2-3: In post production, Keller has a rule of 1-2-3 or 123 percent enlargement of a shot before you see pixilation.
![]() Don’t ask someone to retell something the same way: The first answer is almost always the best because the viewer gets to see the interviewee’s ideation. If they keep retelling it you lost that moment that’s almost impossible to repeat.
Don’t ask someone to retell something the same way: The first answer is almost always the best because the viewer gets to see the interviewee’s ideation. If they keep retelling it you lost that moment that’s almost impossible to repeat.
Interview for an interview subject: When you’re determining who to interview at a company, just call and ask for some information from some key people. As you’re talking to them you’ll be able to hear if they’re passionate about the subject and if they know what they’re talking about. If they are passionate, ask if you can interview them. If they’re not, ask if there’s someone else you can talk to about this same subject.
For more video story tips, read Keller’s articles on:
Connect with “Hacking Media Production”
Thanks for supporting the show. Please subscribe to “Hacking Media Production” on iTunes, write a review, check out past episodes, and if you have any friends that make content for a living, please tell them to listen to the “Hacking Media Production” podcast. Thanks.